Gluten Free Sun-Dried Tomato Wrap – Flavoring your wraps

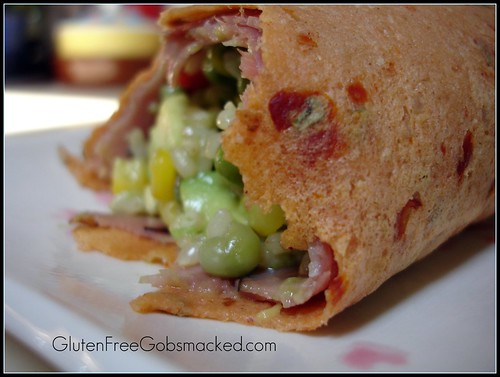
Gluten Free Sun-dried tomato wrap, originally uploaded by Kate Chan.
Today at the market, I stopped to pick up something for my Love’s lunch tomorrow along with some fruit and herbs. As I was looking around, I noticed (once again) the fridge of fresh spinach-wrapped or tomato-wrapped sandwiches lined up… and looking tasty. It was then that I knew I had to stop *thinking* about making the flavor-packed, fresh-herb punched-up wraps, and just do it.
And man, am I glad I did!
I guess I don’t just leave well-enough alone.
But in this case, I’m very glad I didn’t.
I had the best gluten-free, brown rice salad, avocado and ham sandwich today all wrapped up in a super-thin sun-dried tomato, whole grain wrap. And the recipe? Why you already have the basics of it here. What I worked out today was how to add flavor boosts to the wrap with fresh herbs, spinach or sun-dried tomatoes.
Last night we had Cherry burgers with the lavash wrap as our buns. The only thing I did differently was divide the recipe further and I made individual wraps as thinly as possible. By NOT putting all of the dough on one parchment, the wraps were much thinner (and cooked faster). (Each recipe made 6 individual large wraps (like burrito-sized tortillas.) They were a perfect addition to dinner.
Today I used dry-packed sun-dried tomatoes for one of the recipes. (If you wish to use the oil-packed variety, the omit the oil called for in the recipe.) I also have a great basil and pine nut wrap ready for dinner and tomorrow’s lunches.
And all of this work? All of this bread making? It has taken me about 30 minutes (with baking time) to make 4 large jelly roll/cookie sheets of wraps. How did I manage to do this so fast? Speed up your baking by prepping your mixes. (Mary Frances has a great post about it here.) Since I make the lavash wraps as our standard/basic for pizzas, pitas, wraps, etc, I make sets of the dry mix up at one time. This helps me cut back on my time for cooking – and makes me MUCH more likely to eat something healthy from the kitchen rather than snack away.
So back to the flavor-boosting, you say?
Okay. No problem.
The ingredients listed in bold-type are different than those in the lavash wrap recipe. While the basics are the same (sorghum, millet, etc), the liquids are different and there is an addition of baking powder to lighten the bread further. We’ve been adding the baking powder to the lavash recipe to make super thin pizza crusts which we love with just fresh basil and fresh mozzarella with a bit of sea salt. OH YEA! Gluten Free is so good!
Gluten-Free Sun-Dried Tomato Wraps
Recipe makes 2 large thin wraps + 1 individual burrito-sized wrap (OR just 2 large, but not quite as thin)
Ingredients:
1/4 cup sorghum flour
1/4 cup millet flour
1/4 cup potato starch (NOT flour)
1/4 cup tapioca starch
1 Tablespoons yeast
1 Tablespoon dried minced onion
2 Tablespoons powdered buttermilk or non-dairy powdered milk
2 teaspoons xanthan gum
1 teaspoon fennel, oregano
1/2 teaspoon sea salt
1 teaspoon GF baking powder
1 1/4 cup of warm water (+/- tablespoons of water, depending on your flours)
1 Tablespoon agave nectar or honey or sugar or 1/2 teaspoon stevia powder
1 Tablespoon olive oil
1 teaspoon apple cider vinegar
1/3 generous cup (or 1 ounce) dry-packed sun-dried tomatoes (If using oil-packed sun-dried tomatoes, consider lessening or omitting the oil called for in the recipe.)
2 tablespoons tomato paste (Optional – for stronger tomato flavor-boost. HOWEVER, if you omit it, you will need to lessen your water by 1/4 cup.)
Directions:
- Preheat oven to 350F.
- Mix together all dry ingredients (sorghum flour through baking powder).
- Finely chop the sun-dried tomatoes.
- Add sun-dried tomatoes to warmed water and allow to soak for 2 minutes or so until tender and refreshed.
- Add agave (or honey or sugar), oil (if using dry-packed), vinegar and tomato paste to water/tomato mixture. Stir well.
- Add to dry ingredients and mix on medium-high for 1-2 minutes.
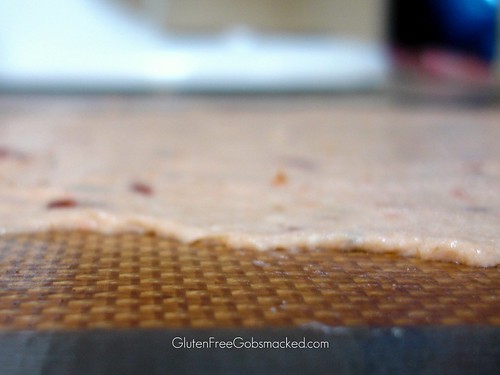
- Use a wet spatula to smooth out 1/2 the dough on to a large cookie sheet or jelly roll pan lined with parchment paper or a silpat. Here’s a picture of how much dough was left in the pan after the first wrap was smoothed out.

Here’s a picture of how thinly you can get the dough. Just remember to continually re-wet the spatula in water and be patient.
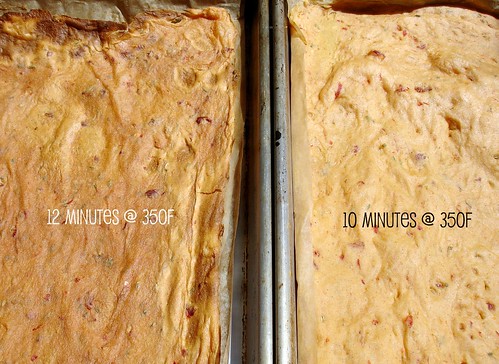
- Bake at 350F for 10-11 minutes. Here’s a picture of comparing the texture/appearance of two wraps. The one on the left was baked for 12-13 minutes and then one of the right was baked for 10 minutes.
- Allow to cool slightly and then you can easily peel the wrap off the silpat or the parchment. If, while you are lifting, the wrap begins to tear, stop and lift from the other side. It will come off smoothly/easily – no worries!
- Store in an airtight container or baggie on the counter. This wrap recipe (and the lavash wrap) work beautifully for sandwiches for the next 2-3 days.
You can easily make the next’s days lunch/sandwich the night before and refrigerate your lunch box. (This is what we do.) It remains flexible and tasty. AND, I don’t have to get up wickedly early in the morning. Everything is packed and ready to go in the fridge. Wahoo!
For other flavor variations, try these ideas – or post your own for others to try too!
- For Basil infused wraps: ADDITIONS: Add 1/2 cup fresh basil to 1 cup of water and blend in a blender until smooth. Add this liquid to the dry mix plus sweetener, oil and vinegar. Add black pepper and 3 tablespoons of toasted pine nuts, ground. OMIT: Fennel, Oregano, Tomato paste and lessen water
- For Spinach-wraps: ADDITION: Add 1/2 cup fresh spinach leaves to 1 cup of water. Blend together in a blender until smooth. Add this liquid to the dry mix plus sweetener, oil and vinegar. Add 1/2 teaspoon garlic powder (or add 1-2 cloves to the spinach/water to puree) and 1/2 teaspoon black pepper. OMIT: Fennel, Oregano, Tomato paste and lessen water.
What are your favorite wrap flavors?
These are only the ones I’ve tried so far. I can’t wait to try more!
On with the experimenting –
Kate

